
The Ultimate Guide to St. Patrick's Day Sensory Play: Eleven Sensory Play Recipes for March
- Gina
- Mar 7
- 6 min read
Updated: Mar 10
In this BLOG post I will share eleven different sensory play recipes.

If you are looking to add some festive fun into your days this BLOG post is for you! I have listed all of our favorite sensory set-ups for you to try.
They are engaging, fun and work on SO many skills while they play.
Try one or try them all. They are perfect for March or all year round!
You get to decide what is safe and manageable in your home. Always monitor young children.

Materials:
1 cup flour
1 cup water
1/4 cup salt
2 teaspoons cream of tartar
1 tablespoon vegetable oil
food coloring
Step 1: Pour all ingredients into a pan. Mix the food coloring into the water, then pour into the pan.
Step 2: Cook over medium heat, stirring frequently.
Step 3: When it forms a solid ball, remove from pan.
Step 4: After it cools, knead well.
Step 5: Store in an airtight container for up to 6 months!
If you are going to make multiple colors, make one batch for each!

Materials:
Tree mold or ice cube tray
Sensory tray or bowl
Baking soda
Water
White vinegar
Pipette or medicine dropper
Food coloring (optional)
Glitter (optional)
Step 1: Grab an ice cube mold. I prefer silicone but you can use anyone you have!
Step 2: In a bowl, pour in 2 cups baking soda and 1/2 cup of water. If adding food coloring, add a few drops and mix well!
Depending on how many you are making, you may need to double/triple the measurements.
Step 3: If you are using glitter, sprinkle it into the bottom of the mold now. Then, fill the mold with the mixture. Freeze for a few hours until solid.
Step 4: Once frozen, place in a sensory tray or bowl. In a cup or bowl, mix together half water and half white vinegar.
Step 5: Use a pipette or medicine dropper and squirt the mixture onto the cubes. Watch as they bubble and fizz!

Materials:
Cornstarch
Hair conditioner or lotion
Food coloring (optional)
Glitter (optional)
Mixing cup
Bowl
Spoon
Sensory tray or bowl
Any tools or trinkets you'd like
Step 1: Measure and pour (1) cup of conditioner or lotion into the bowl.
Step 2: If you are adding glitter or food coloring, mix it in now.
Step 3: Pour in (2) cups of cornstarch.
Step 4: Mix all of the ingredients until fully incorporated. After you mix your dough, it may still look a bit crumbly. Here's where your hands get a workout! Take the mixture out & knead it. The more you squish & squeeze & smoosh the dough, the softer it gets! As all of the ingredients blend together, the dough becomes silky soft, easy to mold & perfect for little hands.
Step 5: Place it on your sensory tray or bowl, add in your favorite tools and trinkets and PLAY!

Materials:
Spaghetti
Food coloring (optional)
Mixing bowl
Pot
Sensory tray or bowl
Step 1: Bring water to a boil. Add pasta and cut according to the directions on the package.
Step 2: Drain the pasta and split into the amount of colors you are making. You can split them into a mixing bowl or Ziploc bag,
Step 3: Add 5-10 drops of food coloring (add more or less depending on how much you make) and mix well, assuring that the colors are fully incorporated.
Step 4: Pour the spaghetti onto a baking sheet or sensory tray and let it dry for about 30 minutes.
Step 5: Drop it on your sensory tray or bowl and PLAY!!!

Materials:
1/2 cup of white Elmers liquid glue
1/2 teaspoon of baking soda
1 tablespoon of contact lenses solution
3 cups shaving cream
Glitter (optional)
Food coloring (optional)
Mixing bowl
Mixing cup/spoon
Sensory tray or bowl
The type of contact lenses solution matters! This serves as your activator and what turns your slime into the stretchy, smooth texture that it is! Be sure to look at the ingredients; it needs to contain boric acid!
Step 1: Pour the glue into the bowl.
Step 2: Add the baking soda, food coloring and glitter (if using) and mix well.
Step 3: Add the shaving cream. Slowly add the contact lenses solution and stir. As you continue to stir, you will see the slime begin to take shape. Once it is formed into a ball, pulling away from the sides of the bowl, it is ready!
Step 4: Grab the slime and knead it well. This will assure that all of the materials are incorporated well.
Step 5: Drop it on your sensory tray or bowl and PLAY!!!
You can add in your favorite play dough tools, cookie cutters and/or trinkets. OR just play as is, the more you stretch and squish and squeeze the dough, the stronger your fingers get!

Materials:
Your uncooked sensory base filler of choice (rice, pasta, chickpeas, etc)
Food coloring and white vinegar OR Acrylic Paint OR liquid watercolor paints
Ziploc bag or container with lid
Parchment paper or Foil
Baking sheet
How To:
Line the baking sheet with parchment paper or foil. Set aside.
Pour the sensory base into the Ziploc bag or container.
Add your color to the base:
Food Coloring + Vinegar Method: For every 1 cup of base filler, add 1 tbsp of white vinegar. Then add 5-10 drops of food coloring.
Acrylic Paint Method: For every 1 cup of base filler, add 4-5 squirts of paint.
Liquid Watercolor Method: For every 1 cup of base filler, add 2-3 tablespoons of liquid watercolor paint.
Shake and squish until the color is fully incorporated.
If you want the color to be darker, add more food coloring or paint. Shake and squish again!
Pour dyed filler onto the lined baking sheet and spread out.
Let dry for 30 minutes to an hour. Lay out in the sun if possible & it will dry even quicker!
Mystery Water:

Materials:
Water
Cornstarch
Food coloring (optional)
Mixing bowl
Mixing cup/spoon
Sensory tray or bowl
St. Patrick's Day trinkets (coins, pots, gems etc)
Step 1: Pour the water into the bowl.
Step 2: If using food coloring, add 3-5 squirts and mix well.
Step 3: Add 2 tablespoons of cornstarch and mix well. You want the cornstarch to dissolve into the water and make it "cloudy" so you can't see the bottom.
Step 4: Add in your favorite St. Patrick's Day trinkets.
Step 5: PLAY!!!

Materials:
(2) cups Cornstarch
(1) cup Water
green food coloring (optional)
Sensory bin or bowls
Spoon
Glitter (optional)
Plastic Easter eggs (optional)
Step 1: Pour cornstarch and water into a tub or tray and mix well.
Step 2: If you are adding food coloring, mix it directly into the water first.
Step 3: Add in your favorite scoops or bowls and PLAY!!
Fizzy Fun:

Materials:
Baking soda
White Vinegar
Food coloring (optional)
Glitter (optional)
Plastic cup or bowl
Sensory tray or baking dish
Pipette or medicine dropper
Step 1: If you are adding glitter, sprinkle it in the bottom of your sensory tray or bowls (I used plastic cauldrons from the Dollar Store).
Step 2: Sprinkle baking soda in the bottom of your tray or bowl.
Step 3: Add a few drops of food coloring on top of the baking soda, then cover it with more baking soda.
Step 4: Fill a separate bowl or cup with white vinegar. You can dilute it halfway with water to make it last longer. Stir.
Step 5: Fill your pipette with the vinegar/water mix & squirt it into the baking soda tray. Watch as it bubbles & fizzes & colors mix together.

Materials:
Craft pom poms
Fruit juicer
Water
Sensory tray or bowl
Step 1: Add craft pom poms to your sensory tray or bowl.
Step 2: Fill with water.
Step 3: Add in the fruit juicer. You can also add in cups, bowls or spoons.
Step 4: PLAY!
To dry pom poms: squeeze out all of the excess water and lay on a towel to dry. You can also put them in a dryer bag and tumble on low.
Rainbow Rock Salt:
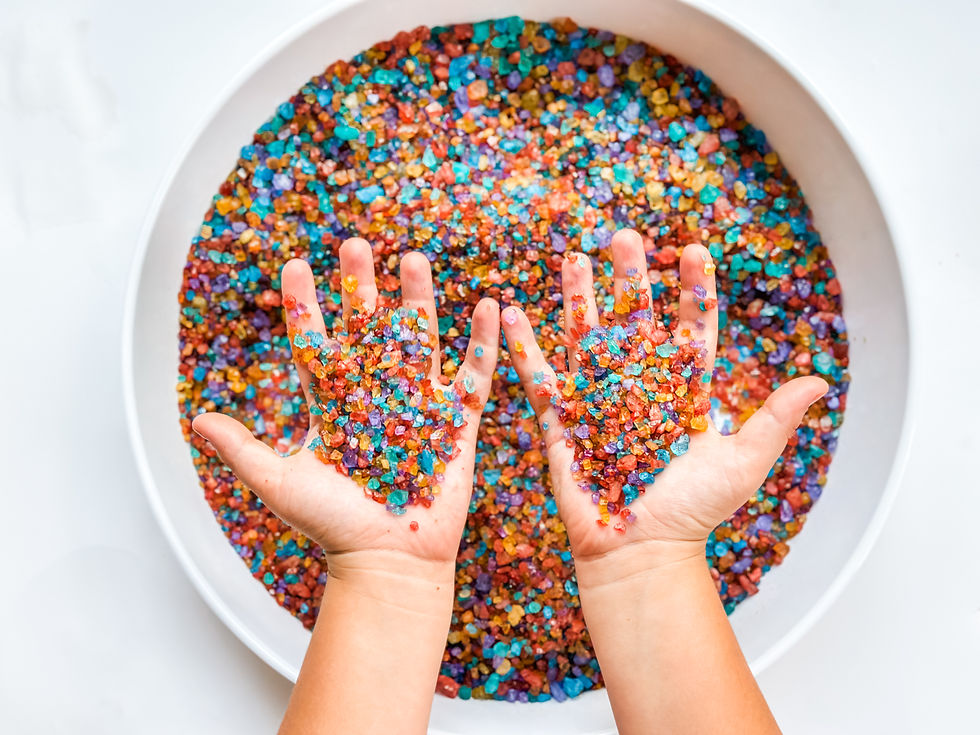
Materials:
Ice cream salt (also called rock salt)
Food coloring
White vinegar
Ziploc bags
Sensory tray or bowl
Baking sheet
Parchment paper
Measuring cup/spoon
Step 1: For every one cup of rock salt, add one teaspoon of white vinegar and 5-7 squirts of food coloring.
Step 2: Place ingredients in a Ziploc bag. Seal and mix well so the rock salt is evenly coated.
Step 3: Pour on to a baking sheet or sensory tray lined with parchment paper and let dry.
Step 4: Stir occasionally, to assure that the rock salt is drying on all sides.
Step 5: Once completely dry, add your favorite scoops, bowls and trinkets and PLAY!
Want a FREE St. Patrick's Day activity pack? Click HERE to download!


Comments